1. Assessing the “Before” State
The “before” stage captures the original condition of the house. This step highlights areas needing improvement.
- Visual Condition:
- Worn-out walls (faded paint, cracks, or outdated wallpaper).
- Damaged or mismatched flooring (scratched wood, chipped tiles).
- Outdated furniture and fixtures.
- Functional Issues:
- Inefficient layout with wasted or cramped spaces.
- Poor lighting (dim, uneven, or lack of natural light).
- Old or malfunctioning utilities like plumbing or electrical systems.
- Exterior and Landscaping:
- Peeling paint, weathered exteriors, or cluttered yard spaces.
- Limited curb appeal with unkempt landscaping.
2. Planning the Transformation
This stage involves conceptualizing the redesign based on the homeowner’s vision, needs, and the house’s structural constraints.
- Goals:
- Modernize the interior and exterior.
- Improve functionality (better flow, more storage, or increased lighting).
- Reflect personal style (minimalist, rustic, industrial, etc.).
- Design Elements:
- Color Scheme: Transition from dull tones to vibrant or neutral modern palettes.
- Furniture Update: Replace or repurpose existing pieces with contemporary or thematic furniture.
- Space Optimization: Reconfigure layouts, add storage, or create open-plan areas.
- Energy Efficiency: Upgrade windows, insulation, and lighting to eco-friendly options.
3. Executing the Changes
The transformation process includes construction, installation, and styling phases.
Key Upgrades
- Living Room:
- Before: Cluttered with bulky furniture and dark tones.
- After: Open-plan with sleek furniture, a neutral palette, and layered lighting.
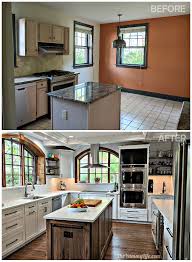
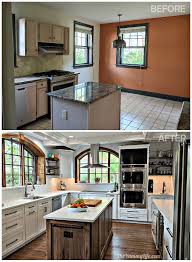
- Kitchen:
- Before: Old cabinetry, limited counter space, and outdated appliances.
- After: Modern cabinets with soft-close technology, granite or quartz countertops, and stainless steel appliances.
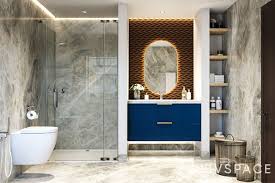
- Bathroom:
- Before: Cramped layout with old tiles and fixtures.
- After: Expanded space with glass shower enclosures, wall-mounted vanities, and fresh tiles.
- Bedrooms:
- Before: Plain walls, insufficient storage, and old lighting.
- After: Customized wardrobes, accent walls, and stylish bed setups with modern lighting.
- Exterior:
- Before: Faded walls, cracked pathways, and a lack of landscaping.
- After: Fresh paint, new windows, updated pathways, and a lush garden or patio setup.

4. Highlighting the “After” Results
The “after” stage showcases the improvements made. Use before-and-after comparisons to emphasize the transformation.
- Enhanced Aesthetics:
- Fresh colors and harmonious decor themes.
- Updated furniture and statement pieces.
- Improved Functionality:
- Smart layouts with multipurpose spaces.
- Modernized utilities and storage solutions.
- Increased Value:
- Better curb appeal and marketability.
- Higher energy efficiency and reduced utility costs.
5. Visual Storytelling
Document the transformation journey using pictures, videos, or digital renderings.
- Before Photos: Showcase problem areas in their raw state.
- During: Capture the renovation process (demolition, installations, etc.).
- After Photos: Highlight the polished final look with wide-angle shots and close-ups of details.
6. Case Study Example
Living Room Transformation
- Before: Dark, cramped with heavy curtains and outdated furniture.
- Changes Made:
- Knocked down a partition to combine living and dining areas.
- Installed large windows with sheer drapes for natural light.
- Replaced heavy furniture with sleek, modular pieces.
- After: Bright, airy space with a minimalist decor theme and layered lighting.
7. Tips for Successful Transformations
- Budget Management: Allocate funds wisely by prioritizing high-impact areas.
- Professional Help: Work with architects, designers, or contractors for major renovations.
- DIY Details: Add personal touches like wall art, handmade furniture, or curated decor.


No responses yet